
Master winter photography in the Himalayas with expert tips on shooting in the Himalayas, from protecting your batteries in extreme cold to capturing crisp snow scenes and breathtaking night skies; plus thoughtful, ethical practices when photographing remote mountain communities.
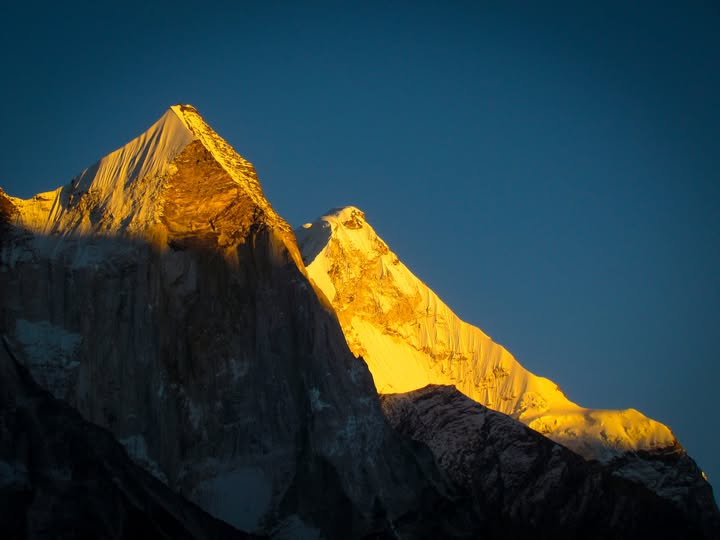
The first time I watched my camera battery die at 60% charge, I was standing at 12,000 feet in Spiti Valley. The sun was painting the snow-covered peaks gold, and my screen went black. That moment taught me more about shooting in the Himalayas than any workshop ever could.
Winter in the Himalayas isn’t just beautiful; it’s brutal on equipment and photographers alike. But here’s a surprising fact: professional photographers lose an average of 40% battery capacity when shooting in sub-zero temperatures, yet most never prepare for it. If you’re planning to capture the Himalayan winter, you’re about to learn what the pros know.
This guide will save your gear, your shots, and maybe even your fingers.
Why Winter Changes Everything for Himalayan Photography
Winter transforms the Himalayas into a photographer’s paradise and nightmare simultaneously. The air becomes crystal clear, visibility extends for miles, and the landscape wears a coat of pristine white that makes every frame look like a postcard.
But cold weather doesn’t care about your Instagram feed. Batteries drain faster, lenses fog up, and your fingers go numb just when you need precision most.
The difference between amateur and professional winter photography isn’t just skill. It’s preparation.
Keeping Your Camera Alive in Freezing Temperatures
Understanding What Cold Does to Your Gear
Lithium-ion batteries hate cold weather. The chemical reactions that generate power slow down dramatically when temperatures drop below freezing.
Your fully charged battery might show 100% at room temperature. Take it outside in -10°C conditions, and it could die within an hour.
Here’s what actually works:
Body Heat is Your Secret Weapon
- Keep spare batteries in inside jacket pockets, close to your body
- Rotate batteries every 30-45 minutes during extended shoots
- Never leave batteries in your camera bag outside
The Two-Battery System
- Shoot with one battery while warming another against your body
- Use hand warmers in dedicated battery pockets (not directly on batteries)
- Invest in a battery grip that holds two batteries for extended power
Smart Charging Strategies
- Charge batteries the night before at room temperature
- Avoid charging in extreme cold; it damages battery cells
- Bring 3x more batteries than you think you’ll need
Watch this detailed tutorial on battery management in extreme cold
Power Banks and External Solutions
External USB battery packs can keep your camera running in emergencies. But they face the same cold-weather challenges.
Keep them warm. Use them as backup only. Your body-warmed spare batteries are more reliable.
Lens Management
The Foggy Lens Disaster
You’ve been shooting outside for hours. Your gear is ice-cold. You walk into a warm tea house, and within seconds, your lenses fog up completely.
Condensation isn’t just annoying; it can damage your equipment permanently. Water droplets can seep into lens elements or camera bodies, causing fungus growth or electronic failure.
The Prevention Protocol
- Before entering warm spaces, seal your camera in a plastic bag while still outside
- Let equipment warm gradually to room temperature (30-60 minutes)
- Never wipe condensation off; let it evaporate naturally
- Use silica gel packets in your camera bag constantly
The Quick-Access Technique
- Keep one “warm weather” camera body inside your jacket
- Use it for quick indoor shots without condensation issues
- Dedicate cold gear for outdoor shooting only
Lens Selection for Winter Conditions
Prime lenses are superior for winter shooting. Fewer moving parts mean fewer points of failure in extreme cold.
Wide-angle lenses (16-35mm) capture expansive snow landscapes magnificently. The 24-70mm range offers versatility for both landscapes and cultural shots.
Avoid zoom lenses with extending barrels; they trap cold air and moisture.
Shooting in the Himalayas
Early Winter Location Goldmine
Ladakh Region (November-December)
Ladakh in early winter is otherworldly. Before the extreme cold sets in, you get snow-dusted landscapes with accessible roads.
Best Spots:
- Pangong Tso with partially frozen waters creating abstract patterns
- Nubra Valley for snow-covered sand dunes (yes, sand dunes with snow)
- Magnetic Hill road for leading lines through white landscapes
The light here is different. At 11,000+ feet, the thin atmosphere creates intense colors during golden hour.
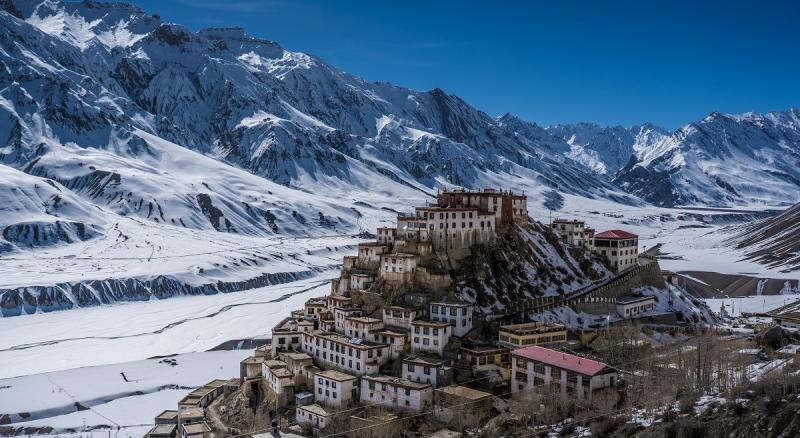
Spiti Valley (Late November-Early December)
Spiti before deep winter offers the perfect balance. Snow covers the mountains, but villages remain accessible.
Must-Shoot Locations:
- Key Monastery covered in fresh snow with dramatic clouds
- Chicham Bridge with winter fog rolling through the gorge
- Kaza town for authentic life-in-the-snow documentation
Timing is critical. Arrive too early, and you miss the snow. Too late, and roads close.
Uttarakhand’s Hidden Gems (December-January)
While tourists avoid winter, photographers should embrace it.
Overlooked Locations:
- Chopta-Tungnath trek for snow-covered temple photography
- Auli for pristine snow fields with oak forest contrast
- Munsiyari for Panchachuli peaks in winter clarity
Discover stunning winter photography locations in the Himalayas
Shooting Snow Without Blowing Out Your Images
The Snow Exposure Challenge
Snow fools your camera’s light meter every time. Your camera sees all that white and underexposes, turning pristine snow into dull gray.
The Solution:
- Overexpose by +1 to +2 stops from your meter reading
- Use your histogram religiously; push whites to the right edge without clipping
- Bracket exposures when uncertain (shoot at 0, +1, +2)
Shoot in RAW format always. You need that latitude for recovery.
Working with Shadows and Contrast
Winter light creates incredibly deep shadows and brilliant highlights simultaneously. This range can exceed your camera’s dynamic range.
Shadow Management Techniques
- Shoot during golden hour when shadows are longer but softer
- Use graduated ND filters to balance sky and snow
- Embrace the contrast; sometimes deep shadows add drama
Blue hour in winter is magical. The snow reflects the blue sky creating an ethereal glow that lasts longer at high altitudes.
Night Sky Photography in Crystal Clear Winter Air
Why Winter is Prime Time for Astrophotography
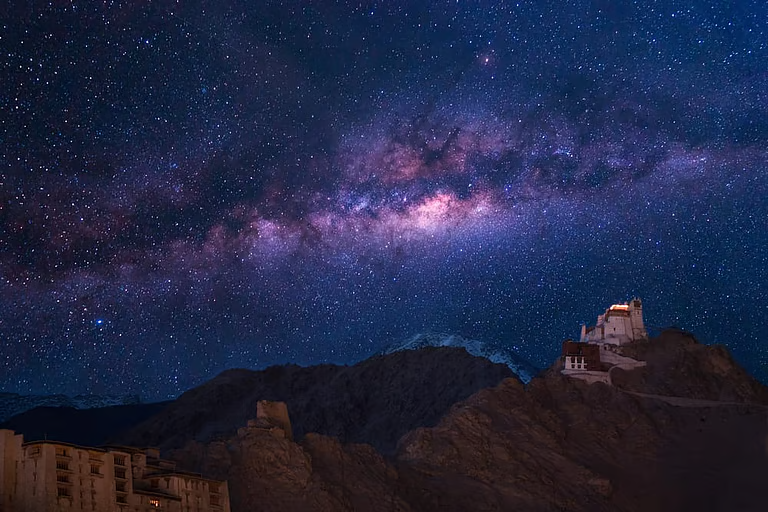
The Himalayas in winter offer some of Earth’s clearest skies. Humidity drops to almost zero, pollution freezes and settles, and air becomes remarkably transparent.
Light pollution is minimal in remote locations. You can capture the Milky Way core even in winter months (though it’s lower on the horizon).
Camera Settings for Success
- ISO 3200-6400 (modern cameras handle this well)
- 15-25 second exposures (calculate using the 500 rule)
- Widest aperture your lens offers (f/2.8 or faster)
- Manual focus set to infinity (test and tape it)
Essential Gear Beyond Your Camera
- Sturdy tripod that won’t blow over in mountain winds
- Remote shutter release or 2-second timer
- Red headlamp to preserve night vision
- Multiple fully charged batteries (cold drains them faster)
Composition Tips
- Include foreground elements like stupas, monasteries, or tents
- Shoot during new moon phases for darkest skies
- Time your shoot when Milky Way aligns with interesting landscapes
Learn advanced Milky Way photography techniques
Dealing with Extreme Cold During Night Shoots
Night shooting in winter can reach -20°C or colder. Your gear and body need special attention.
Keep your camera outside once you start shooting. Bringing it in and out creates condensation nightmares.
Use chemical hand warmers inside your gloves. Get trigger-finger gloves that let you operate controls without removing them entirely.
Ethical Photography in Remote Himalayan Communities
The Problem with “Poverty Porn”
We’ve all seen them; photos of weathered faces, tattered clothes, and “exotic” poverty that win photography awards. These images often exploit vulnerable people for artistic gain.
Remote Himalayan communities deserve dignity, not to be turned into props for viral content.
Ethical Guidelines That Matter
- Always ask permission before photographing people (not just for legality; for respect)
- Learn basic local phrases: “Photo thik chha?” (Is a photo okay?) works in many regions
- Show people the images you’ve captured and delete if they’re uncomfortable
- Never photograph children without explicit parental consent
The Exchange Principle
If someone gives you their time and allows you into their life through your lens, give something back.
This doesn’t mean paying for every photo; that creates problematic dynamics. Instead:
- Purchase crafts or supplies from people you photograph
- Share printed photos on return visits or through local contacts
- Hire local guides who can facilitate respectful interactions
- Support community initiatives through small but meaningful donations
Context and Storytelling
A portrait without context can misrepresent an entire community. That weathered face might belong to someone with a smartphone, successful children, and a comfortable life.
Capture the full story. Show the solar panels alongside the traditional homes. Photograph the satellite dish next to the prayer flags.
Complexity is more truthful than simplification.
Understanding ethical documentary photography practices
The Unsexy But Critical Stuff
Weatherproofing Essentials
Even “weather-sealed” cameras aren’t truly waterproof. Snow melts, creates moisture, and finds its way into electronics.
Your Protection Kit:
- Rain covers designed for cold weather (regular ones get stiff and crack)
- Ziplock bags for emergency protection
- Microfiber cloths (keep several in inside pockets)
- Rocket blower for removing snow from lens surfaces
Never wipe snow off your lens with your glove or jacket. You’ll scratch the coating faster than you can say “expensive repair.”
The Gradual Transition Technique
Preventing thermal shock protects your investment. Sudden temperature changes stress lens elements and electronic components.
Coming In From The Cold:
- Place gear in sealed plastic bags while still outside
- Leave bags closed for 30-60 minutes in a transition space (porch, vestibule)
- Open bags only when condensation stops forming on the outside
- Let gear warm to room temperature before use
Going Out Into The Cold: The reverse matters too. Cold gear fogging up because you didn’t let it cool down wastes precious shooting time.
Making Snow Look Like Snow
The White Balance Challenge
Your camera’s auto white balance will make snow look blue, gray, or even yellow depending on conditions.
Color Temperature Guidelines:
- Sunny snow: 5500-6500K
- Cloudy snow: 6500-7500K
- Shade: 7500-9000K
Don’t be afraid of cool tones. Sometimes that blue cast is what makes winter images feel cold and dramatic.
Bringing Out Texture in Snow
Pure white snow is boring. Great snow images show texture, dimension, and depth.
Key Adjustments:
- Increase clarity slightly (5-15) to enhance surface detail
- Use graduated filters to add subtle gradients across snow fields
- Boost shadows selectively to reveal snow texture without muddying whites
- Add contrast through curves rather than the contrast slider
The Luminosity Mask Method
- Select only the brightest whites
- Reduce exposure slightly (prevents blown highlights)
- Add back local contrast to show snow texture
Master snow photography post-processing
Safety Considerations That Save Lives
Altitude and Cold: The Double Threat
Most Himalayan winter photography happens above 10,000 feet. Altitude sickness combined with cold weather is dangerous.
Symptoms to Never Ignore:
- Severe headache that doesn’t respond to medication
- Difficulty breathing while at rest
- Confusion or inability to walk straight
- Persistent nausea or vomiting
No photograph is worth your life or health. Descend immediately if you experience these symptoms.
Emergency Communication
Mountain regions have spotty or no cell coverage. Remote areas require backup communication.
Consider satellite communication devices like Garmin inReach. They’re expensive but can literally save your life.
Always inform someone of your shooting location and expected return time.
What Actually Works
Camera Bodies for Winter Conditions
Professional bodies handle cold better than entry-level cameras. Better weather sealing, superior battery life, and more robust construction matter in extreme conditions.
Recommended Models:
- Canon EOS R5/R6 series (excellent cold weather performance)
- Nikon Z8/Z9 (outstanding battery life)
- Sony A7R V (good, but requires more battery management)
Lenses Worth Carrying
Every lens adds weight at altitude. Choose carefully.
My Essential Kit:
- 16-35mm f/2.8 for landscapes and night sky
- 50mm f/1.8 for portraits and low light
- 70-200mm f/4 for distant mountains and wildlife
The 70-200mm f/4 is lighter than the f/2.8 version. At altitude, that weight difference matters enormously.
Support Gear That Earns Its Weight
Cheap tripods fail in cold weather. Plastic parts become brittle, locks freeze, and legs collapse.
Invest in carbon fiber. It’s lighter and doesn’t conduct cold like aluminum does.
Peak Design Capture Clip has been revolutionary for my winter shooting. It keeps your camera accessible without dangling from your neck in the cold.
Self-Care While Shooting
Preventing Frostbite and Hypothermia
Photographers are particularly vulnerable to cold injuries. We stand still for long periods, focusing on composition while our bodies lose heat.
Critical Protection:
- Layer properly: base layer, insulation layer, wind-breaking outer layer
- Protect extremities: insulated gloves, wool socks, face mask
- Recognize early warning signs: numbness, tingling, white or grayish skin
Hot tea in a good thermos isn’t luxury; it’s safety equipment. Warm fluids from inside help maintain core temperature.
The Focus-Warm-Shoot Rhythm
Don’t try to be a hero standing in the cold for hours straight. Your photos will suffer along with your body.
Smart Shooting Pattern:
- Scout and compose for 10-15 minutes
- Return to shelter to warm up
- Go back out for the actual shoot
- Repeat as needed
This rhythm produces better images because you’re thinking clearly and your hands work properly.
Seasonal Timing
Early Winter (November-Early December)
Fresh snow blankets the landscape, but conditions remain relatively accessible. Roads are still open, temperatures hover around -5°C to -10°C at night.
Best For:
- Snow-covered landscapes with autumn colors still visible
- Cultural photography in villages preparing for deep winter
- Accessible high-altitude locations before extreme cold
Mid-Winter (December-January)
Deep winter brings extreme cold but exceptional clarity. This is when the Himalayas look most dramatic.
Best For:
- Minimal crowds and authentic experiences
- Crystal-clear night skies for astrophotography
- Dramatic weather conditions and cloud formations
Late Winter (February-March)
Temperatures start rising slightly, and days grow longer. Snow begins melting at lower elevations while peaks remain white.
Best For:
- Extended golden hour light
- Contrast between snow-covered peaks and green valleys
- Wildlife photography as animals become more active
Building Your Winter Photography Portfolio
Creating Cohesive Series
Random beautiful images don’t tell stories. Professional portfolios show themes, progression, and depth.
Series Ideas That Work:
- “A Day in Winter” following light from pre-dawn through night
- “Faces of Winter” portraying community life in cold months
- “Sacred Winter” documenting monasteries and spiritual life
- “Vertical Worlds” showing altitude zones from valley to peak
The Story Behind the Shot
Every powerful image has context. Document your process, conditions, and challenges.
These stories make images more valuable for publication and social media engagement. People love knowing you waited four hours in -15°C for that perfect light.
Common Mistakes That Ruin Winter Shoots
Mistake #1: Shooting Everything Wide
Beginners shoot every scene with wide-angle lenses. But intimacy matters in storytelling.
Use telephoto lenses to compress distance, isolate subjects, and create layers in snow-covered landscapes.
Mistake #2: Ignoring Midday Light
Conventional wisdom says midday light is bad for photography. In snowy mountains, it can be magical.
Bright midday sun on fresh snow creates sparkle and texture impossible to capture during golden hour.
Mistake #3: Over-Editing
Winter images have inherent drama. Over-processing ruins their natural beauty.
Keep adjustments subtle. If your image looks like it has an Instagram filter at 100%, dial it back.
The Real Reward
The technical skills matter. Protecting your gear matters. Creating ethical, respectful images matters enormously.
But here’s what really matters: standing at 15,000 feet, watching first light paint the peaks gold while your breath creates clouds in the frozen air. The satisfaction of capturing that moment exactly as you envisioned it.
Winter photography in the Himalayas will challenge everything you know about photography. It will push your limits physically, technically, and creatively.
And it will reward you with images and experiences that last a lifetime.
Want more expert photography tips delivered to your inbox? Subscribe to our newsletter for weekly insights, location guides, and exclusive behind-the-scenes content.
Nikhil Raj Sharma, Founder – Himalayan Geographic: “I want to emphasize the safety aspects covered in this article. We’ve witnessed too many photographers pushing boundaries in dangerous conditions for ‘the shot.’ The gradual acclimatization advice and emergency communication recommendations aren’t just suggestions; they’re essential protocols. At Himalayan Geographic, we’ve always maintained that the best photograph is the one where everyone comes home safely. The technical excellence displayed here, combined with ethical practices and safety awareness, represents exactly the kind of responsible mountain photography we advocate for.”
“We strive to use only images that are either royalty-free, in the public domain, or shared with appropriate permissions. However, if you believe any image on this website has been used without proper credit or violates copyright, please contact us immediately. We will promptly review the content and, if necessary, update the attribution or remove the image without delay. We do not claim ownership of any third-party images unless explicitly stated.”
